Harmony:
100-word Summary:
* Presentation video and Final Blog Submission can be located at the end of the blog.
Hand-made Model Summary:
Paper model 1:20
Paper model (2) 1:20
Cardboard model 1:10
Cardboard model (2) 1:10
Final Paper model 1:50
Final Paper model (2) 1:50
...................................................................................................................................................................
Paper model 1:20
- (For ease of stability and workability of the material (paper), I made this analogue model at 1:20 scale).
- I decided upon undertaking a Pop-up model design to add a whole new dimension to my 2d plans and to overcome the limitations of thin paper material.
- Inspired by my background in engineering, the mechanisms hidden behind the ingenious folding and cutting techniques in such models, became the primary reason behind making this type of model.
- I also decided upon a destructive pop-up model, (where elements that pop up originate from the paper which it "pops" out from). This is a direct influence of my overlying design principle of "evoking balance between abstract ideas and reality". Hence I let the cut and folded areas, leave behind a hollow space behind them to highlight how in true balance (when a space has been destroyed, it is done to create another space).
Combine the two paper portions, and the entire room is constructed.
My colour mask, which was chosen of the merit with how it interacts with light:
- I found that light paper and cream brought out the light gradients in a softer tone than other colours:
- These coloured papers also received shadows with more clarity than other materials

Top views:
\
Cardboard model 1:10
Experimentation with video folding techniques including simple spirals, dividing the paper, no crease etc.

Herringbone Tessellation (Practice):


Following this experimentation with folds, I took it a step further and applied it to make a paper rose using bending, folding and cutting techniques I learnt in my experimentation phase.
Steps to making a rose out of folded, carved and pleat structures.
My Re-imagined model:
I enhanced the cardboard model as I felt it had the most potential to be transformed. Further, the folding experimentation would serve as the right sized ornamentation to my model and would help its interaction with the light.
with a raised ceiling and (custom openings for light permeation)
- Abstract room features/ furniture made from paper folded forms.

Basic Aperture made in cardboard ceiling to allow for light:
- Cling wrap allows for a shininess and subtle reflectivity that is characteristic of glass.

As you can see, the cling wrap nicely reflects and hazes the exterior artificial light as glass windows do.
Contrast between initial and final Cardboard model:

Fusion 360 Initials exercise:
Fusion 360 Rendered Initials:
I like how Fusion can render reflective materials which cannot be done in SketchUp and it has the capability of rendering an environment, which I also experimented with.
Combination 1: Brass polished, steel mesh and carbon fibre
I have chosen the brass polished appearance to emanate the sensation of running your fingers across smooth brass instruments (labrasones), which I can relate to as many family members, including myself can play some of these instruments and I have grown up around them in my household. The steel mesh is reminiscent of chain mail that knights would wear and symbolises the sense of security and protection that playing music can relay.
Combination 2: Leather matte (blue), Granite Black and white)
I have chosen the blue leather texture and reduced its transparency to the appearance of deep water. Since I've been swimming from a young age, I feel a sense of connection with water. The tonal deficit of the granite is meant to assert a sense of solidarity and calmness that is associated with diving.
Combination 3: Jade (Green-white), Textured glass (frosted light) and Mirror
I have chosen the jade green and white texture as I have always been fascinated by the qualities and aesthetics of emeralds and ruby. Jade keeps the wearer from harm and brings harmony. Jade attracts good luck and friendship. It stabilises the personality and promotes self-sufficiency. Soothes the mind, releasing negative thoughts. Further, the frosted light and mirror appearance create that smooth texture and permeability of light that is characteristics of such gems.

STL- file format initials:
Fusion 360 Transformed Model:
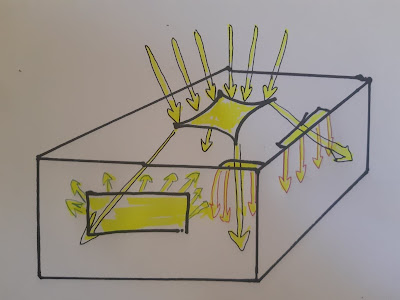
The new thresholds and spaces, adjoining my room have been carefully articulated to allow light into the room, through new facades:
- The vertically spanning side tower attached to the original door, will bring about light through a high sky-light and a balcony beside my bed to enjoy the serenity of the outside spaces.
These sketches show how I added these spaces to my original room, the next sketch shows how light interacts with my room and thresholds:
- I experimented with the landscape and render mode once again to visualise what my transformed room would look like in real-life context.
- Then I laid out the different pieces of my model, to export to an illustrator template:
- Removing hidden pieces which showed up in Illustrator was a hassle, but once positioned into the green allocated space, the template was ready to be laser cut.
Manifesting Fusion 360 into reality:
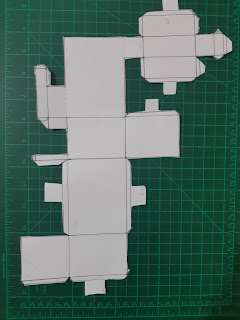
Modelling Fusion 360 model using folding and tabs method instead of laser cutting. I chose a 1:100 scale so the paper won't bend and I could fit the template on an A3 page. This model is compliant to the folding and tab type model in lieu of a mortice and tendon type model (because the planes are thin and will not lock easily).
The 3mm tongue and grooves in the template to be laser cut, became a guideline for my tabs, which I folded and glued (red regions) to make my model stronger than the previous ones.

Final paper model: (1:50)
This negative lighting from the inside of the room illustrate the location of different thresholds and how light will come inside/ leave the premises.
These next few images describe how light can enter through different openings and thresholds in this final model.
Main entry:
Ceiling:
Door:
Balcony:
Wholistic Axonometric perspectives under spotlight:
Open-faced interior views:
My Photoshop Renders:
I felt that there needs to be a sense of harmony in the composition and use of materials in a model. Hence I aspired to use textures which balance each other and evoke this idea of harmony.
Overall I believe the photoshop render, allowed the textures to fit seamlessly into the model as the perspective is done well, through the use of warping and the vanishing point tool on photoshop. The colour mapping of the individual textures blends with the tones present in the context due to the lighting manipulation. I do believe that the shadowing can be improved to make the surfaces protrude less.
Render 1:
At first, I struggled to grasp photoshop as seen in this render, but eventually, I developed my own process to render images realistically which you can see in my evolution over the renders.
My Materials:
Render 2:
- For my first render I used a rosewood exterior feature wall, watercoloured marble interior feature wall and a woven panelled balcony fence.
- I felt that the rosewood exterior interacted well with the tone and colour of natural light, which was completed by the natural material of the woven fence. Further, I felt there need be a contrast to the warmer elements of the exterior, hence I decided upon a cooler, blue marble interior wall as my final texture. This worked well once I adjusted the light gradient to fit into the darker, interior space.
- For this image, in particular, I imagined It as a cabin in the woods and imported appropriate textures.
- The original colours of the textures made it look 2d and unrealistic, so after reducing the exposure and contrast and introducing shadows, the difference * was apparent and a “weathered” look was achieved.
- Similarly for the background, which seemed flat at first, completely transformed* when:
- Shadows were created in the right locations
- Hue of blue was adjusted, allowing the model to seem natural in fit well in the context.
Rosewood :
Woven fence:
Watercoloured marble:
Render 3:
Neutral plasterboard
concrete slabs:
Tiles:
Curated Blog Summary:
(Showcases my ten best images from this blog, presented in a way that best communicates my design journey).
Justification for the 10 images:
- Since this is a course about communication, I have put my written plans and draft sketches as a base layer, to justify how everything I have created has been the result of careful drafting and planning.
- This curation of images highlights the parts of my blog that showcase my strengths and accomplishments BUT also my weakness and the design which have allowed me to learn from my mistakes:
24/03/20: Cardboard model (1:10) re-imagined space
- My preoccupation with lighting and creating mood through shadows is something I captured in my photographs and wanted to communicate using this collage in particular:
8/04/20 Experimenting with lighting in photography
- The abstracted photos of my model and their close proximity to the photoshopped ones illustrate the complexity of my design journey and how all my models have been the result of learning and experimenting with the one I have made prior to it.
30/03/20: Photographing model inspired from fusion 360
- The green overlay colour is a testament to my design purpose of "evoking harmony and balance" through the use of colours and materials.
- ( I have chosen the jade green and white texture as I have always been fascinated by the qualities and aesthetics of emeralds and ruby. Jade keeps the wearer from harm and brings harmony. Jade attracts good luck and friendship. It stabilises the personality and promotes self-sufficiency. Soothes the mind, releasing negative thoughts. Further, the frosted light and mirror appearance create that smooth texture and permeability of light that is characteristics of such gems.

11/04/20 Fusion 360 rendering Initials
- The contrasting blue and yellow origami flower is another example of how I believe balance in my models is achieved through contrast.
23/03/20: Folding exercise (paper rose)
- Correspondingly the central focus model is my final model made using the folding and tab type model in lieu of a mortice and tendon type model, which has a hollowed fusion 360 model, overshadowing it to illustrate how my digital models have played a big role in the creation of my analogue models.
29/03/20 Physical modelling of the analogue model
28/03/20: Fusion 360 modelling
Presentation video:


